Subject: Re: Auvergne Mining Project Mon Feb 25, 2013 8:31 am
Oh alright I'll come clean, I'm teasing you, I know you're searching for the perfect louvres
The aluminium (not zinc) bonnet is actually a heat sink component stripped out of an old French car radio. I've a box full of useful aluminium heat sink sections, but the minute I laid eyes on these I knew what I was going to use them for!
On a serious note, I did see an article many years back (in Railway Modeller I think) on how to make louvres and I plan to have a go for my live diesel body. Basically the process invoved making a negative mould in wood for a single louvre, making the vertical slit with a dremel and laying the THIN brass sheet over the mould and punching the indent with a chisel shaped tool which matches the mould of course. I've not tried it myself but reckon having a thin sheet would be key!
Carl Hibbs Admin
Location : Haute Normandie - visitors welcome
Subject: Re: Auvergne Mining Project Mon Feb 25, 2013 8:42 am
Ah so the louvres were already punched then.......
But that itself is a very good idea...maybe I'll have a look at old computer or other small electrical equipment casings.....
The female die and male punch I've seen explained in slightly different forms using a chisel as well. I've had some minor success with this but it is tedious and needs care.
Oh alright I'll come clean, I'm teasing you, I know you're searching for the perfect louvres
The aluminium (not zinc) bonnet is actually a heat sink component stripped out of an old French car radio. I've a box full of useful aluminium heat sink sections, but the minute I laid eyes on these I knew what I was going to use them for!
On a serious note, I did see an article many years back (in Railway Modeller I think) on how to make louvres and I plan to have a go for my live diesel body. Basically the process invoved making a negative mould in wood for a single louvre, making the vertical slit with a dremel and laying the THIN brass sheet over the mould and punching the indent with a chisel shaped tool which matches the mould of course. I've not tried it myself but reckon having a thin sheet would be key!
Having had to use a crowbar over the weekend in a tight corner on the K&NWLR, I realise that I might have another use for it. Which make of car was it where you found the radio? Although explaining that I used it for railway modelling if stopped by the gendarmes might only lead to (more) trouble.
GWhizz
Location : Charente, France
Subject: Re: Auvergne Mining Project Sat Mar 02, 2013 2:02 pm
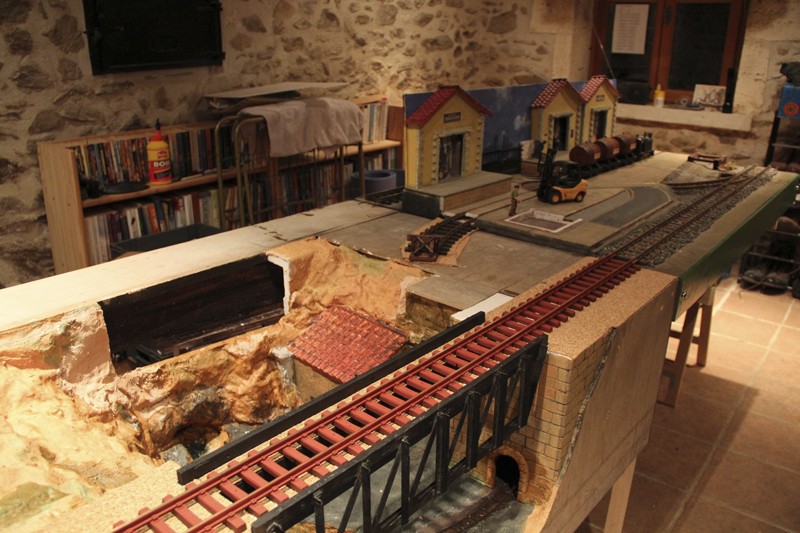
A lick of paint and a few Preiser figures and the module is starting to come to life...
Unfortunately my rockwork looks a bit like an infants' school papermache class. I just hope the patrons of Ferrovi'art will see it as it is - a backdrop for a bit of animation!
tram47
Location : Aquitaine (France)
Subject: Re: Auvergne Mining Project Sat Mar 02, 2013 4:58 pm
félicitations
k&nwlr
Location : Alsace, France
Subject: Re: Auvergne Mining Project Sat Mar 02, 2013 6:44 pm
Apropos rockwork. One of the things that you can do - if you want to do all your plastering in one go (and you´re modelling smaller modules) - is to place the area you are "rocking" on a flat surface, with the cliff face lying on your workbench, so gravity doesn´t affect your work. And if you return a couple of hours later you can have the fun of inscribing the "rock" with the geological patterns that fit your subject.
This being said, the K&NWLR has just spent two hours demolishing a failed platform outside the new warehouse and building a new one with a piece of wood and some industrial-strength polyfilla. The now sagging cliffface, as yet unseen on this forum, will be covered in plants ....
Carl Hibbs Admin
Location : Haute Normandie - visitors welcome
Subject: Re: Auvergne Mining Project Sun Mar 03, 2013 11:22 am
Brilliant Brian, looking forward to seeing this in a few weeks time.
GWhizz
Location : Charente, France
Subject: Re: Auvergne Mining Project Sun Mar 03, 2013 4:33 pm
I've just put the Mine and Cognac modules next to each other and will spend the next few sessions getting them aligned and laying the surface tracks... pics to follow